Building Minesweeper Game from Scratch with Claude3.5 - Basic Features
Minesweeper is such a classic game that I used to play on Windows computers. Now that I've switched to Mac, I haven't played it for a while. Recently, I've been heavily experimenting with Cursor and Claude3.5, writing quite a bit of code with them. So I decided to build a Minesweeper game from scratch using Claude3.5 to see how it would turn out.
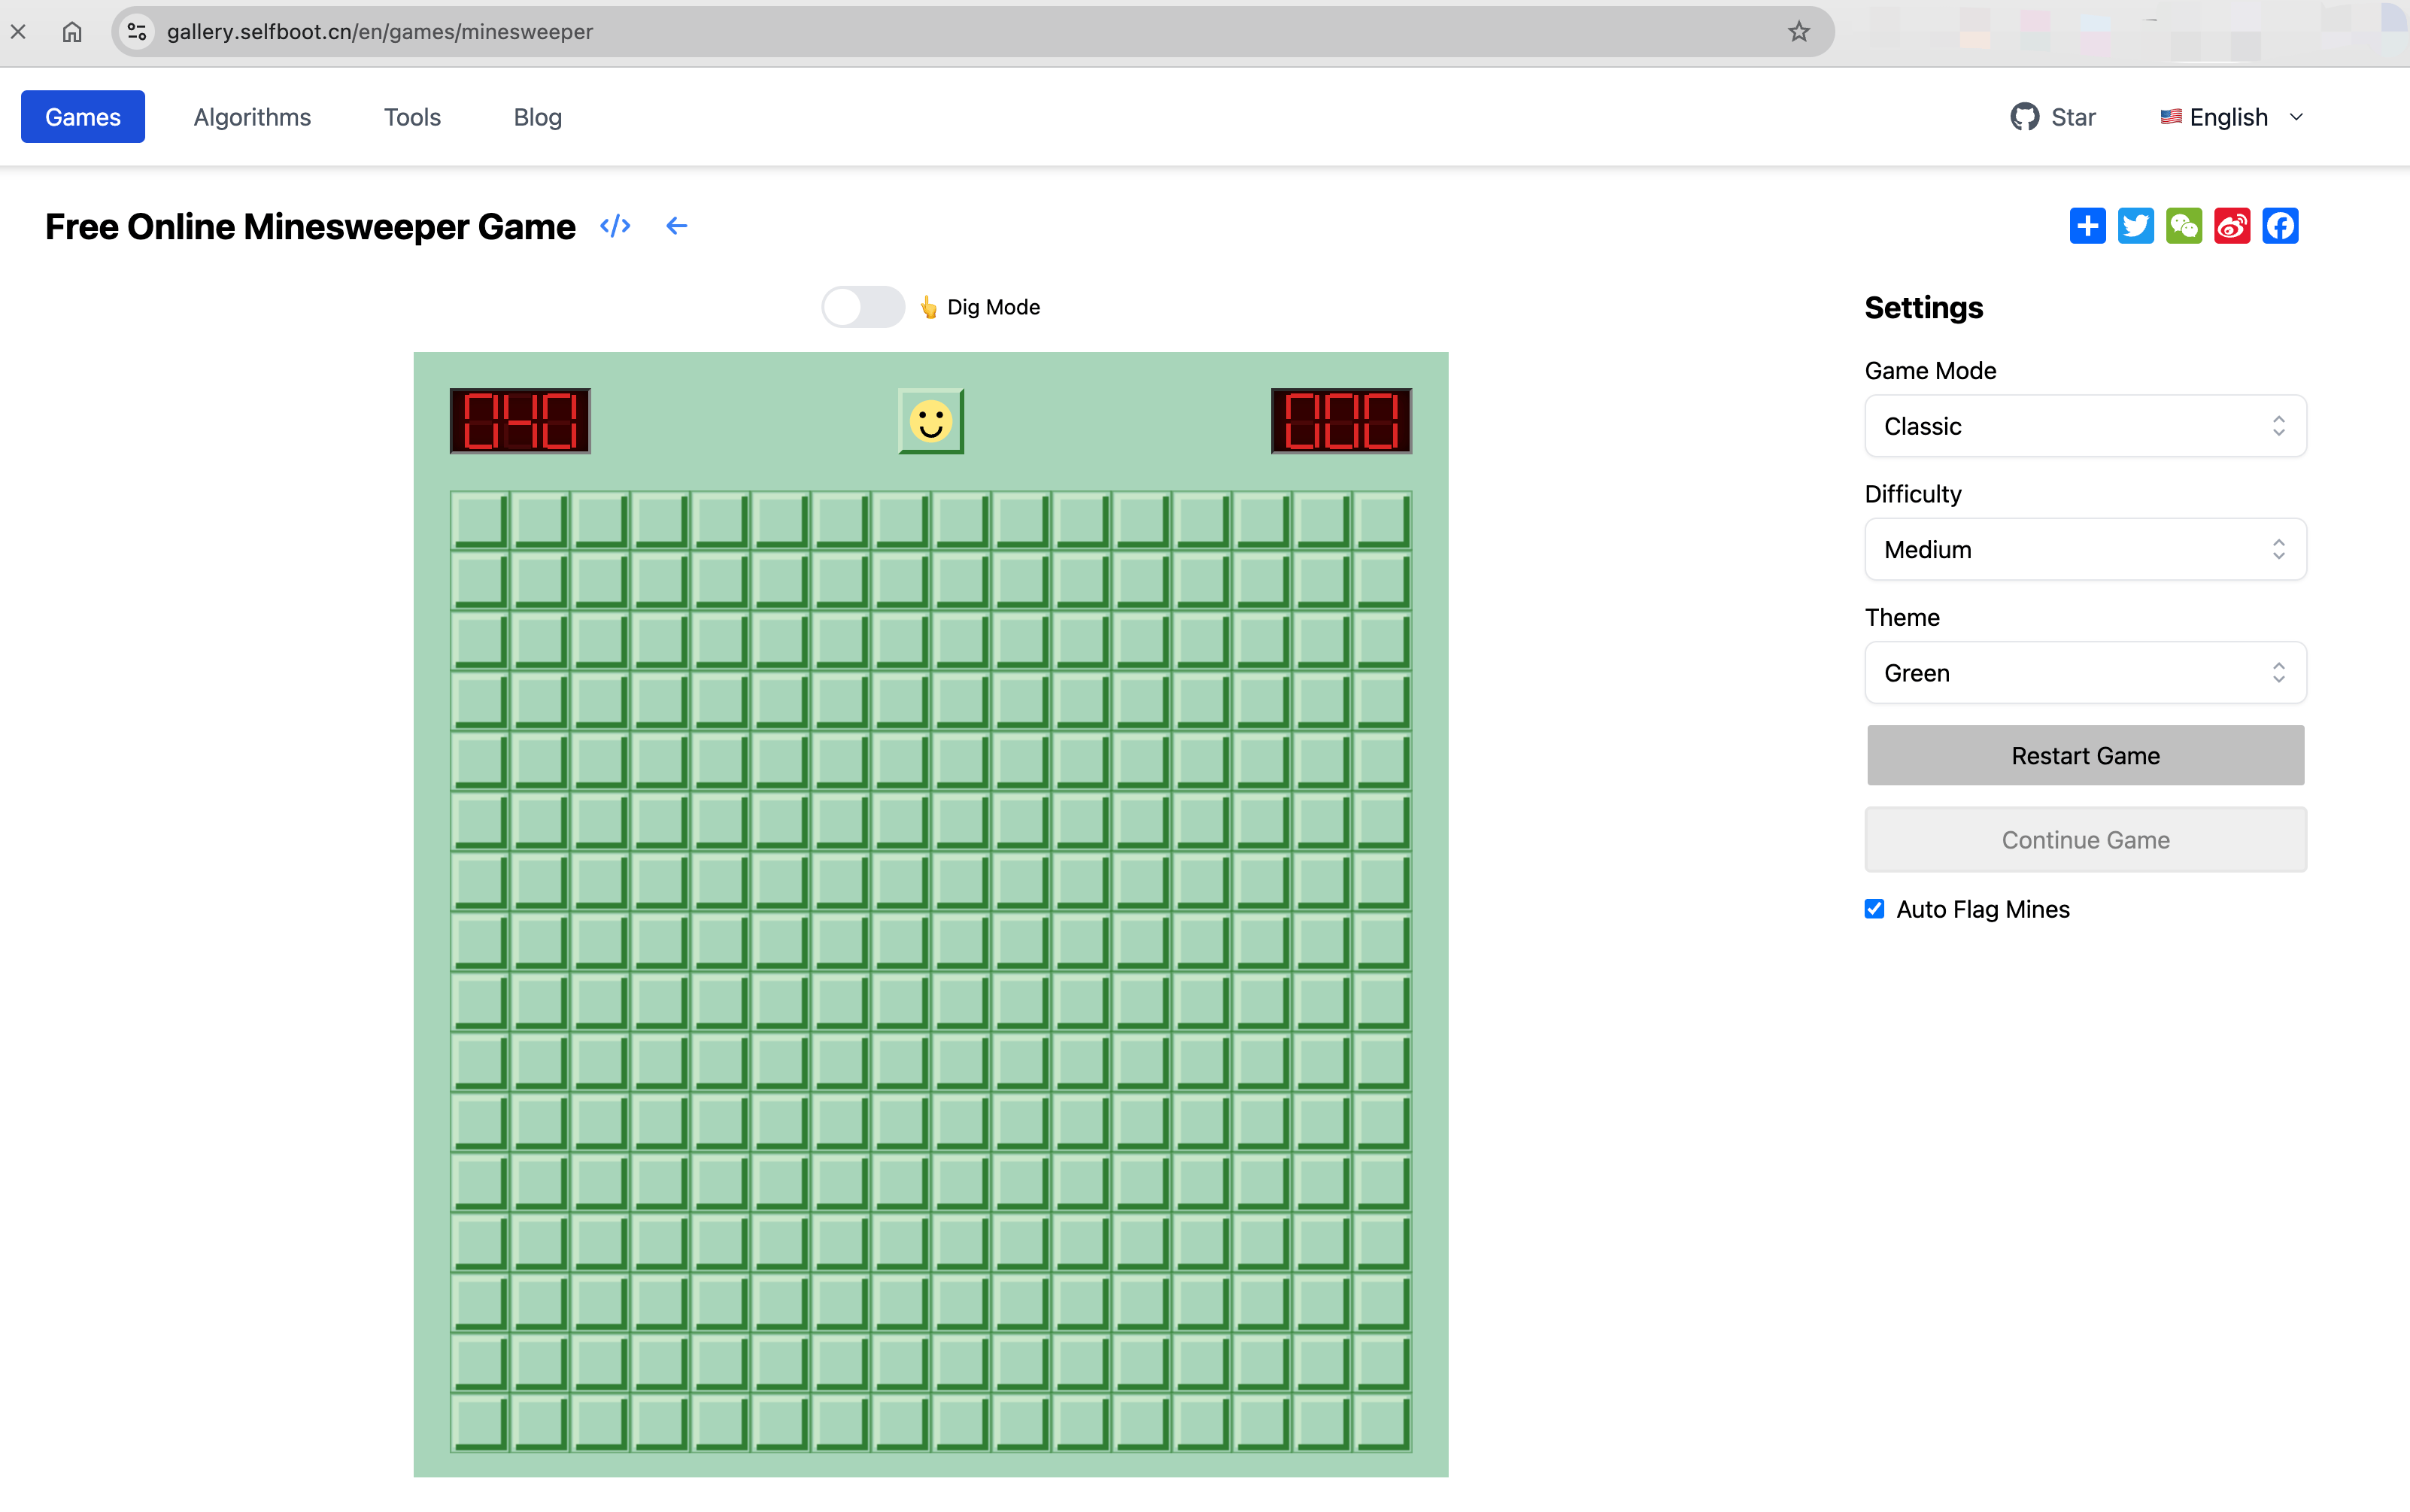
Let me first show you the final result Online Minesweeper Game:

Of course, the Minesweeper I built with Claude isn't just a simple toy. This implementation comes with comprehensive features:
- Supports various game difficulties, including customizable board length, width, and number of mines
- Supports both traditional square grid and hexagonal grid layouts
- Supports automatic mine marking and double-click to reveal surrounding cells
- Supports multiple color themes that can be switched anytime, including yellow, green, and dark themes
I'll use several articles to document my experience developing the Minesweeper game with Claude. This is the first article: Building a Minesweeper Game from Scratch with Claude3.5 - Basic Features.
Quick Game Generation with Claude
The Minesweeper game has quite a bit of logic, and to avoid debugging issues from AI-written code, test cases are definitely needed. So when writing the prompt, I emphasized to Claude to separate UI and implementation logic for easier testing and code maintenance.
Although Claude probably knows the rules of Minesweeper, I still briefly explained the rules in the initial prompt to better constrain Claude's behavior. The complete prompt is as follows:
Help me implement a Minesweeper game using React and Tailwind CSS, with logic and UI separated for easier testing of the logic part.

A Minesweeper board consists of many cells with randomly distributed mines, with at most one mine per cell. The winning condition is to reveal all safe cells (non-mine cells), and the losing condition is revealing a mine cell (stepping on a mine).

There are three basic operations in Minesweeper:

Left-clicking an unrevealed cell reveals it.
Right-clicking an unrevealed cell marks/unmarks it as a mine.
Double-clicking (clicking both left and right buttons) on a revealed number will reveal all surrounding cells if the number of marked mines equals the number.

When stepping on a mine, the game is lost, the triggered mine is highlighted in red, incorrectly marked mines (flags on safe cells) are highlighted in pink, and all unmarked mines are revealed. When winning, the game automatically marks all unmarked mines.

The top-left corner shows the remaining mines (total mines minus marked mines). The top-right corner shows a timer, starting from 0.001 seconds at the first operation of the game.
Since Minesweeper is such a classic game with code available everywhere online, Claude must have learned a lot during training. For such conventional requirements, Claude's code is quite good. Claude implemented a MinesweeperGame class that completely encapsulates all game logic.
class MinesweeperGame {
  constructor(rows = 9, cols = 9, mines = 10) {
    this.rows = rows;
    this.cols = cols;
    this.mines = mines;
    this.board = [];
    this.revealed = [];
    ...
There's also a separate game component, with UI components implemented using React and Tailwind CSS, using React hooks to manage game state and timer. The first version was quite complete, including features like:
- Left-click to reveal cells
- Right-click to mark mines
- Timer functionality
- Remaining mine counter
- Game win/loss detection
Actually, the generated logic handling part is quite comprehensive, and the code is clear and easy to understand. It includes abstractions for various function logic, such as game initialization and single cell revealing. The code quality is not inferior to Minesweeper game code written by most regular developers.
Adjusting the Game Interface
To better integrate this game into my existing project, I needed to adjust the game interface. So I continued with the prompt:
The entire interface is divided into two parts: the game and settings sections.

On large screens, the game takes up 4/5 of the left side, with settings on the right 1/5; on small screens, the game is on top with settings below.
Most pages in this project follow this layout rule, though I haven't systematically learned CSS layouts and Tailwind styles. Fortunately, Claude could accurately modify the existing code to implement my layout requirements based on simple prompts.
There might be some minor discrepancies, but generally after a few more rounds of questions, they can be quickly resolved. After seeing enough examples, I've gained some understanding of Tailwind layouts, and many small errors can be quickly fixed once spotted.
Optimizing Game Interface Rendering
So far, we've implemented a toy Minesweeper game, but the interface still looks a bit rough, so I wanted to continue optimizing. Here I wanted the UI interface to mimic the traditional Minesweeper style as much as possible, and preferably support different themes.
Additionally, I specifically mentioned the technology for rendering the board, directly asking it to use canvas to implement each cell. Here I'll add some personal observations - developers should still have some background knowledge when using AI. This allows for more precise prompts and helps avoid detours.
Previously, when implementing Bloom Filter visualization, Claude implemented numerous cells directly using grid components, resulting in very poor performance. Only after multiple questions did I finally learn that canvas could be used. Without knowing about canvas and not prompting the AI, we might waste a lot of time on an incorrect approach.
Finally, the simple prompt was:
For the entire Minesweeper interface, we need to consider scenarios with many mines, so let's implement each cell using canvas.

Also, the UI interface should mimic traditional Minesweeper style as much as possible, and preferably support different themes.
Claude quickly provided an excellent implementation. This time it designed a traditional style Minesweeper interface using Canvas to render game cells and support theme switching.
class CanvasRenderer {
  constructor(canvas, theme) {
    this.canvas = canvas;
    this.ctx = canvas.getContext('2d');
    this.theme = theme;
    this.cellSize = 24;
    this.borderSize = 3;
  }
  ...
}
Here Claude said its new implementation mimicked the classic Windows Minesweeper interface, with 3D raised effect cells, LED-style counter display, classic gray background, and border effects. Additionally, it optimized the rendering of mines, numbers, and flags.
However, it hadn't actually implemented the 3D raised effect. So I continued with the prompt:
Currently all unexplored cells are connected, each cell should have boundaries and protrusion to make them more distinct
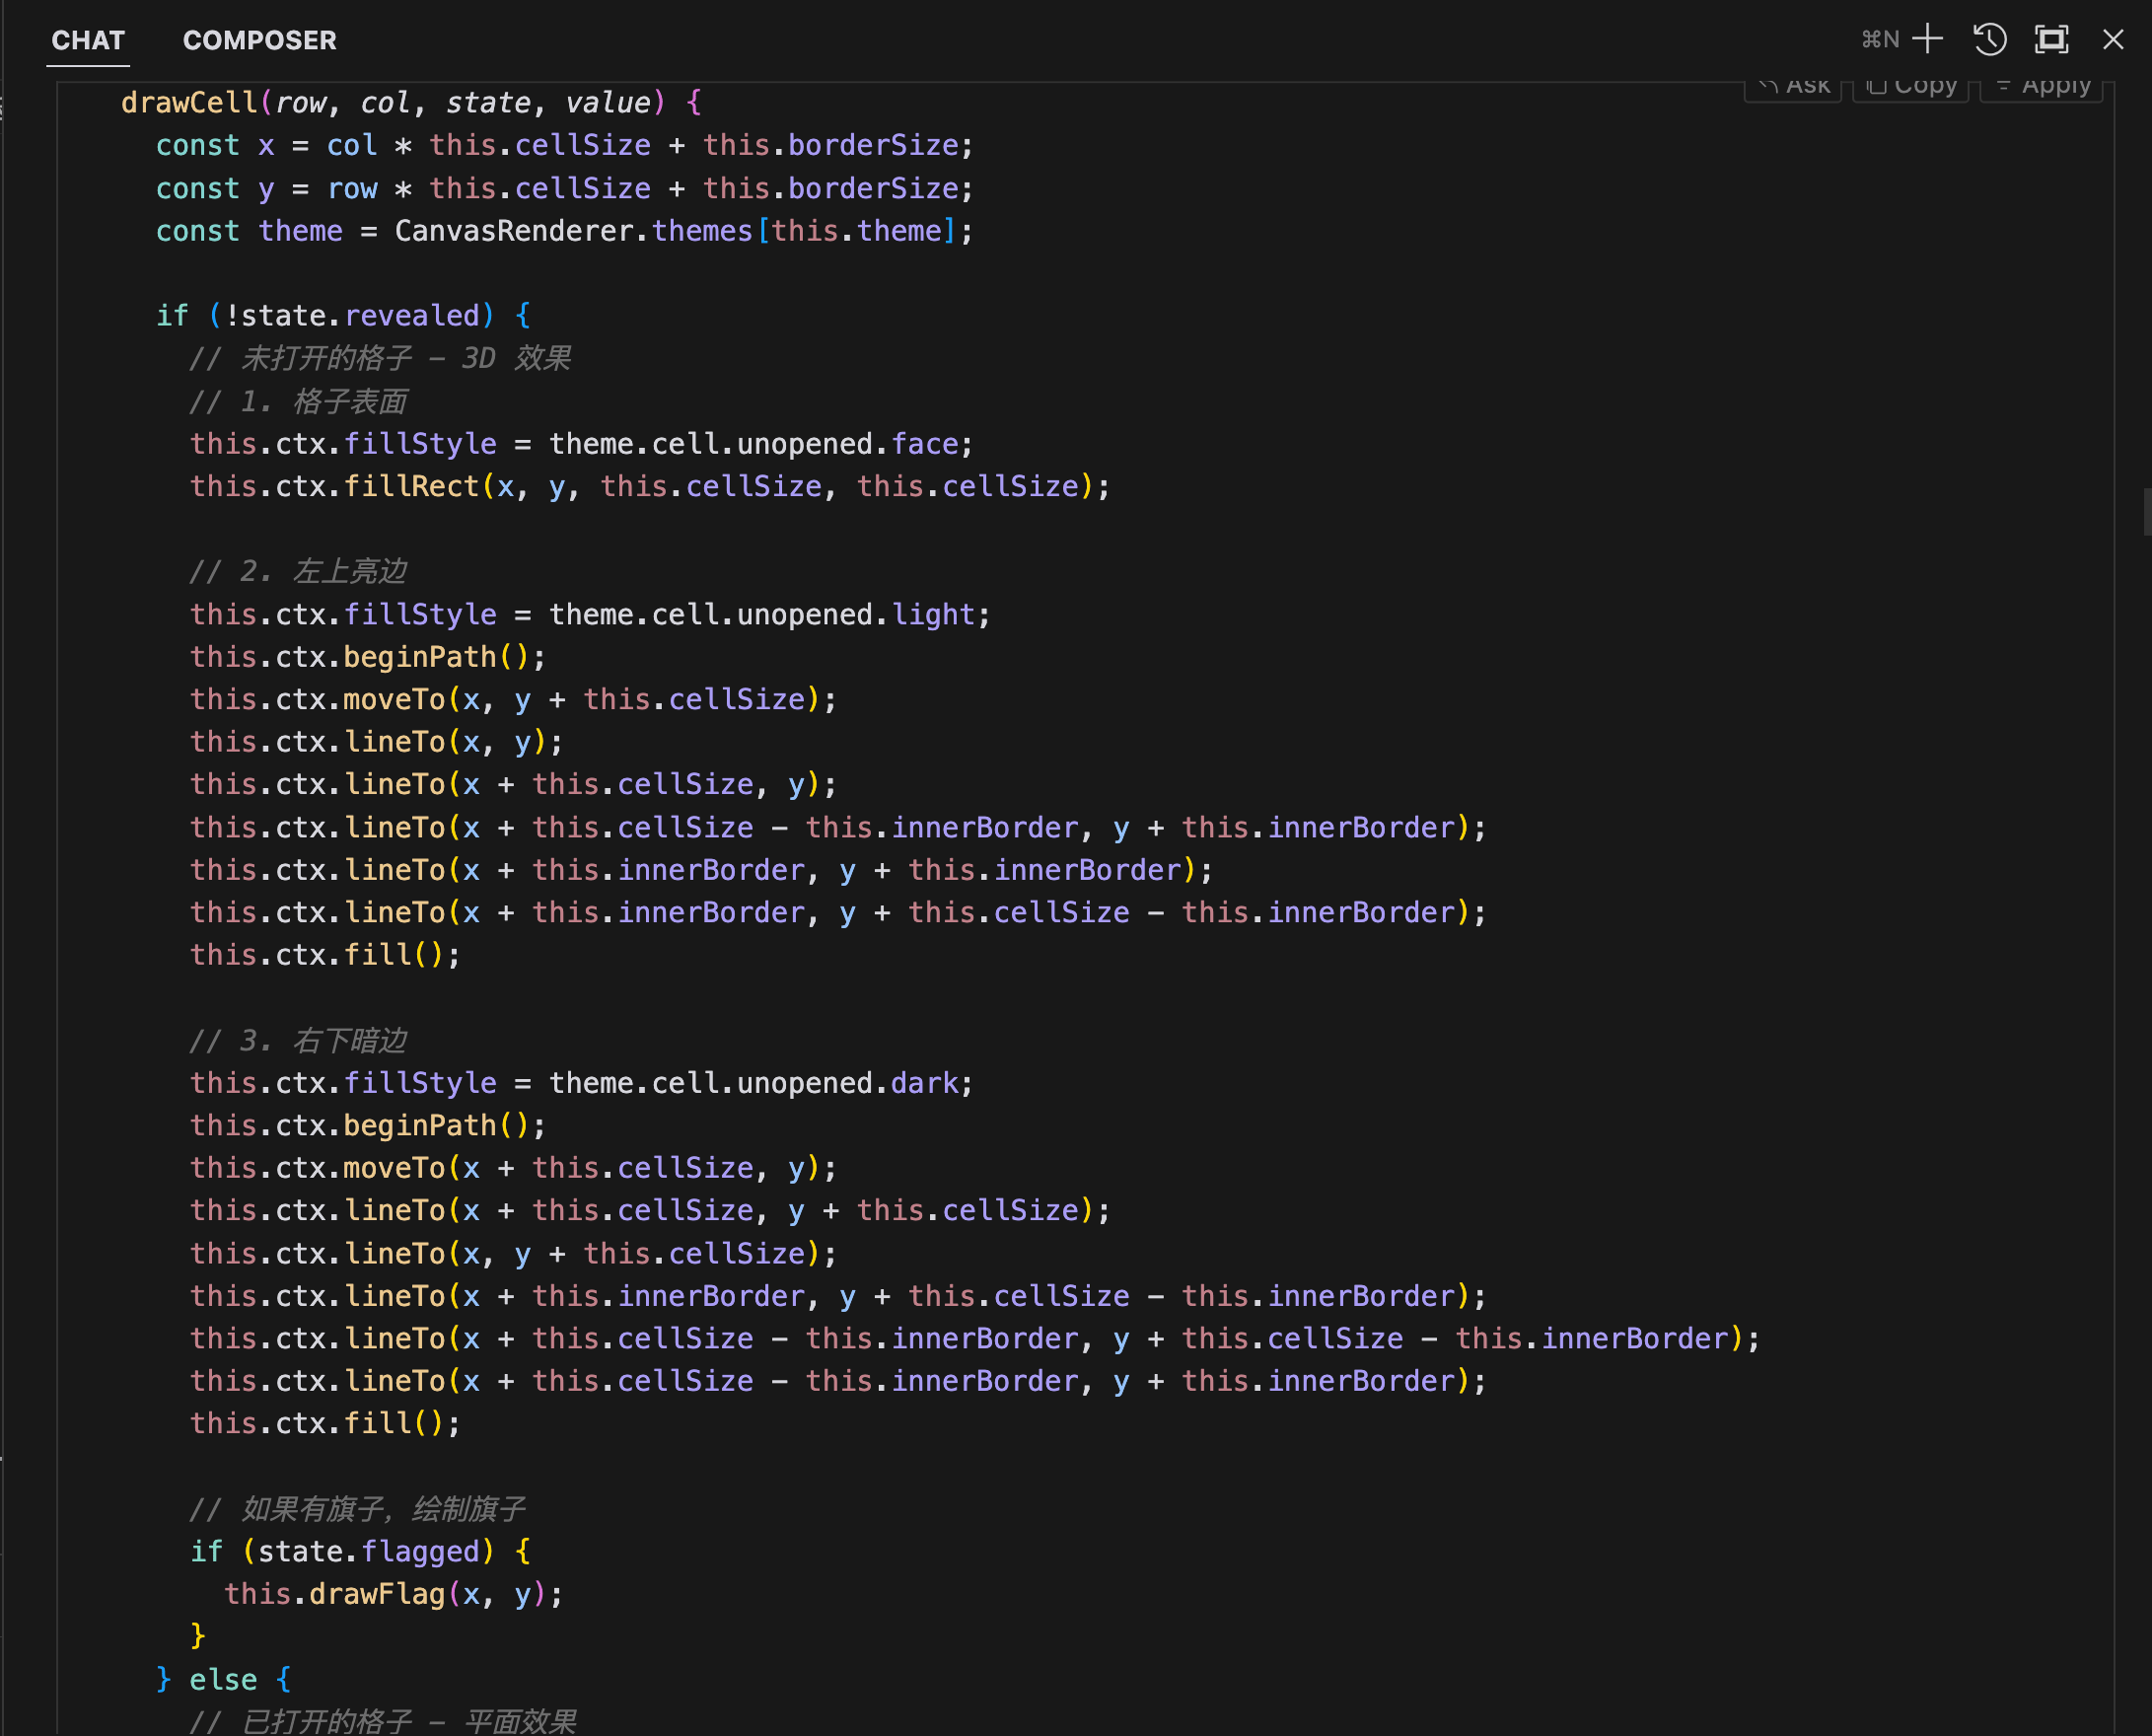
This time Claude modified the CanvasRenderer class to add 3D effects to the cells, making them look more like the classic Windows Minesweeper game. The modified part looks like this:

I must say this exceeded my expectations. I didn't really know how to implement the 3D effect myself and didn't provide very detailed prompts describing the implementation process. Fortunately, Claude3.5 was smart enough to provide complete canvas drawing code and briefly described the improvement method: light edges on the top-left, dark edges on the bottom-right, and the cell surface in the middle, creating a 3D effect.
Without AI, it would have taken me quite some time to implement this 3D effect from scratch.
Fixing Various Small Bugs
At this point, the main framework was basically complete, and then came the very annoying stage. While the code generated by Claude3.5 is of good overall quality and most logic is correct, there are still quite a few small bugs in the details. For example, after the above changes, the page loaded with an error:
Unhandled Runtime Error
TypeError: Cannot read properties of undefined (reading '0')

Source
src/app/[lang]/games/minesweeper/content.js (29:42) @ col

  27 |           col,
  28 |           {
> 29 |             revealed: game.revealed[row][col],
     |                                          ^
  30 |             flagged: game.flagged[row][col],
  31 |             exploded: game.gameOver && game.board[row][col] === -1 && game.revealed[row][col],
  32 |           },
Since I'm not very familiar with frontend development, when encountering such errors, I basically just copy the error message to Cursor, and then Claude3.5 provides modification suggestions based on the error message.
Most of the time, Claude3.5 will explain the cause of the error and provide modification solutions. In Cursor, you can easily see the diff parts of the modifications, then combine them with your own judgment to modify the code.
Of course, sometimes fixing one error might lead to another, requiring patience to fix. In this Minesweeper implementation, because we implemented a lot of code at once earlier, Claude3.5 has a fairly high error rate in long contexts.
Fortunately, since we separated the logic, rendering, and UI parts, it's still quite easy to locate the cause of errors with Claude's help.
Summary
With the help of Claude3.5 and Cursor, I finally implemented a complete Minesweeper game from scratch. There were quite a few problems encountered along the way, but through continuous questioning, they were all eventually resolved. Of course, if I had better frontend fundamentals, we probably could have avoided some detours. Even with something as powerful as Claude3.5, if you're a complete beginner with no programming experience, implementing a complete Minesweeper from scratch is still quite challenging.
For instance, when encountering something unexpected, without programming experience, you might not know how to add logs, and relying purely on AI sometimes can't solve the problem. Having considerable debugging experience and being able to see the basic meaning of the code here helps to locate clues and better prompt Claude to modify the code.
Next, I'll continue with several articles documenting the process of improving the Minesweeper game with Claude3.5.